Introduction
This article describes the process of creating Samba / CIFS storage on a Windows 10 or 11 computer and accessing it from Forcefield to export or import data.
WARNING: Samba / SMB / CIFS v1 as used with Forcefield is now deprecated, and should not be used in most cases, and if it must be used, should be used on a closed / private / secure network protected by a firewall, as there are known vulnerabilities in the SMBv1 protocol. Because of this, you will also find that Windows will also automatically disable it if it is not used for 15 days (and possibly under other conditions as well).
For this reason, we must state that if you intend to use SMB sharing, we advise consulting the site's IT department, and that this is used at your own risk. Aritech are not liable for any damage caused by using SMB sharing.
As an alternative, we can suggest using NFS sharing from Forcefield instead. Please see our NFS sharing article here:
Forcefield - NFS storage and Windows Firewall
Overview
Sharing the folder on a Windows computer uses SMB (Server Message Block) protocol, also referred to as CIFS (Common Internet File System).
Forcefield uses an "SMB (CIFS) Connected Storage" record to define a connection to a shared folder on the Windows Computer (such as a computer used to run a Forcefield client) via a username and password that are created for this purpose.
The following steps or procedures must all be configured in order for Forcefield to access shared folders in the Windows environment (Professional, Ultimate or Enterprise versions only).
You may also need to refer to Windows Help for additional information on some aspects of this process.
Summary of setup required
The following changes are required to allow a Samba/CIFS connection:
1. Preparing the Windows computer
2. Group policy changes to network settings
3. Windows registry changes
4. Create a local user account on the Windows computer
5. Share a folder and give local user read/write access to share
6. Enabling SMB 1.0/CIFS support in Windows
7. Creating SMB (CIFS) storage in Forcefield
Appendix A. - Troubleshooting connection problems
See below for the instructions for each section.
1. Preparing the Windows computer
NOTE: A restart of the computer will be needed after completing the steps in this section.
In this section we will use the Network and Sharing Center to enable file sharing.
Enabling file sharing
1. In the Windows search bar, on or near the start menu, type "cpanel", and run Control Panel:
2. Select the following depending on what mode your Control Panel is in:
- If Control Panel is in Category mode, select the "View network status and tasks" underneath the "Network and Internet" section:
- If Control Panel is in Icons mode, select the "Network and Sharing Centre" option:
3. From here, in the left hand column, select the "Change advanced sharing settings" option:
4. Now select to turn ON "File and Printer sharing", and if you are in Windows 10, select "Save Changes", or for Windows 11, you can simply close the window.
5. In some cases you may be prompted to re-start your computer after this settings has changed. If prompted, you will need to re-start before proceeding.
2. Group policy changes to network settings
In this section we will use the Local Group Policy Editor (gpedit.msc) to configure security settings so that communications from Forcefield are not blocked.
Configuring the security settings
1. In the Windows search bar, on or near the start menu, type "gpedit.msc", and press Enter. This will run the Local Group Policy Editor.
2. Using the > arrows next to the folders, navigate to:
Computer Configuration > Windows Settings > Security Settings > Local Policies > Security Options
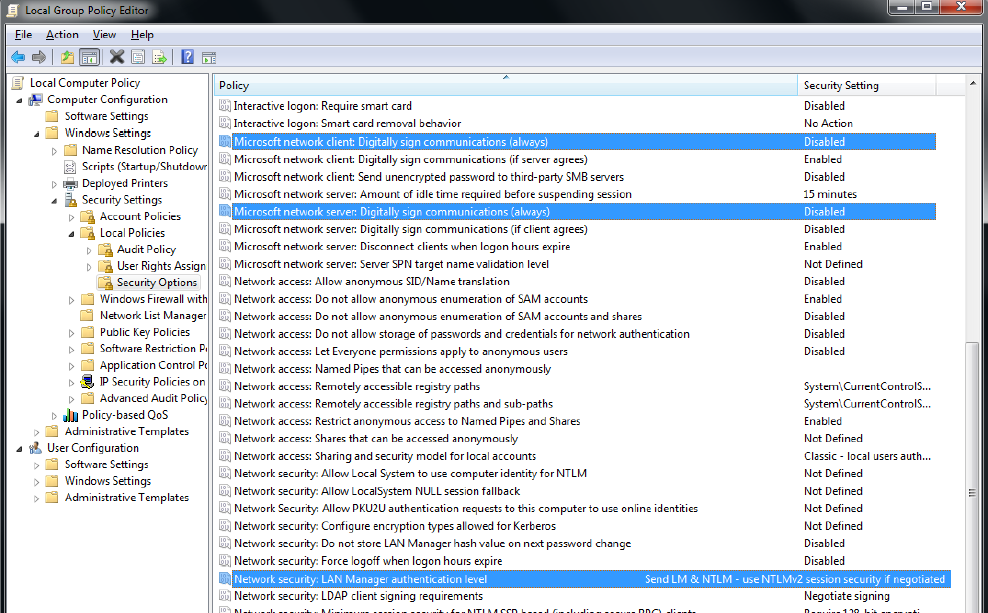
3. In the right hand pane of the window, ensure the following policy settings are set:
- Microsoft network server: Digitally sign communications (always) -> Disabled
- Microsoft network client: Digitally sign communications (always) -> Disabled
- Network Security: LAN Manager Authentication Level -> Set to any that does not “Refuse LM". (Typically use “Send LM & NTLM – use NTLMv2 session security if negotiated”)
4. Exit from the Local Group Policy Editor
A screenshot of the changes required:
This section is now complete.
3. Windows registry changes
WARNING: This section includes instructions for modifying the registry on your computer. Modifying the registry improperly can result in Windows becoming corrupted, and could require a complete reinstall of the operating system and result in data loss. You should only attempt these directions if you have your data backed up and feel confident to do so, or alternately enlist an experienced IT support person. You may also back up the Windows registry before attempting any changes if you are working on a critical system. Aritech is not liable if you choose to attempt the changes described below.
In this section we will use the Registry Editor (regedit.exe) to configure security policies to accommodate the version of SMB used by Forcefield.
Changing the Registry
1. In the Windows search bar, on or near the start menu, type "regedit", and press Enter. This will run the Registry Editor. You may receive a warning, choose "Yes" to continue.
2. Navigate to HKEY_LOCAL_MACHINE > SYSTEM > CurrentControlSet > Control > Lsa.
3. In the right-hand pane, right-click “LmCompatibilityLevel”, and then select Modify. Change the Value data to 1, and then click OK.
4. In the right-hand pane, right-click “NoLmHash”, and then select Modify. Change the Value data to 0, and then click OK.
The following screenshot shows the above changes:

5. Now navigate to HKEY_LOCAL_MACHINE > SYSTEM > CurrentControlSet > Services > LanmanServer > Parameters.
6. In the left-hand pane, right-click the Parameters folder and then select New > DWORD (32-bit) Value.
7. Type “smb1”, and then press ENTER.
8. In the right-hand pane, right-click “smb1”, and then select Modify. Change the Value data to 1, and then click OK.
9. In the left-hand pane, right-click Parameter and then select New > DWORD (32-bit) Value.
10. Type “smb2”, and then press ENTER.
11. In the right-hand pane, right-click “smb2”, and then select Modify. Change the Value data to 1, and then click OK.
The following screenshot shows the above changes:
When finished editing the Registry, exit from the Registry Editor and then restart the computer.
This section is now complete.
4. Create a local user account on the Windows computer
In this section, we show how to create a local user account on the Windows computer for the purpose of accessing the shared export/import folder via Forcefield.
User name and password requirements
NOTE: The user name and password are visible to anyone viewing the “SMB (CIFS) Connected Storage” record in Forcefield, so it may be inappropriate to use an actual operator’s Windows login as the user account.
It is possible to create a local user account on the Windows computer with a password that does not meet the complexity requirements to allow Forcefield to access the shared folder. The password complexity requirements are listed below.
The password must meet the following requirements:
- Between 6 to 14 characters long
- Contain both upper and lower case letters (at least one of each)
- Contain at least one numeral (0 to 9)
- Contain at least one special character (such as @, #, $)
- Not contain consecutive numbers eg. 1357 is ok, but not 2345
- Must not be the same as the user name
Creating the user
1. In the Windows search bar, on or near the start menu, type "Computer Management", and press Enter. This will open Computer Management. (Or you can also type "compmgmt.msc" if "Computer Management" doesn't work for you):
2. In the left-hand pane of the Computer Management window, navigate to System Tools > Local Users and Groups, and then click Users.
3. Click Action > New User… to display the New User dialogue box.
4. Enter a name in the User name field to identify this local user account.
5. Optionally describe the purpose of the user in the Description field.
6. Enter a password that meets the password requirements listed above.
7. Enter the password a second time in the Confirm password field.
8. Click to UN-TICK the "User must change password at next login", and then tick the “User cannot change password” check box and the “Password never expires” check box. The other check boxes must be cleared.
9. Click Create.
The following screenshot shows what the above process will look like:
10. Assigning Administrative permissions membership to this user is now required. To do this, right click on the user you just created, and select "Properties".
11. Now go to the "Member Of" tab, and click the "Add..." button down the bottom.
12. In the "Enter the object names to select" box, type "administrators", and then press the "Check Names" button on the right. If you have typed it correctly, it will be recognised, and the local computer name will be added to the front of it, as shown in the screenshots below:
Entering the "administrators" text ready, before pressing "Check Names":
After pressing "Check Names", the computer name will be added in front of it:
13. Now press the "OK" button on the "Select Groups" window, and the user properties window should look like the screenshot below. Once this is confirmed, press the "Apply" button, and then you can press "OK" to close this window.
User Properties after adding them to the Administrators group, ready to press Apply / OK:
You may now close Computer Management.
This section is now complete.
5. Share a folder and give local user read/write access to share
In this section we will create a shared folder in Windows and give it the correct permissions for the user we just created so Forcefield can access it.
Creating the shared folder and giving it permissions
1. In Windows Explorer, preferably directly under the preferred hard drive (at least not under a user's documents folder or similar), create a folder that will be used as the share, for example, "C:\SMBShare"
2. Right click the folder, and select "Properties"
3. In the Properties window, go to the "Sharing" tab, and press the "Share..." button. Then type in the name of the user you created in the previous section.
Choosing who to share with in the folder's Properties window:
4. After typing the name of the user you created in the previous section, press the "Add" button, and then under "Permission Level", select "Read/Write", and then click the "Share" button.
Adding the user to share with:
5. After it creates the share, if a "Your folder is shared" window pops up, click the "Done" button to continue.
6. Now back in the Properties window for this folder again, click the "Advanced Sharing..." button, and in the "Advanced Sharing" popup, click the "Permissions" button:
7. In this "Permissions" window, press the "Add" button, and in the "Select Users or Groups" window that appears, go to the "Enter the object names to select" box, and type the name of the user you added in the previous section, and then press "Check Names" to verify them. If the user name is entered correctly, it will add the computer name to the front of it, as follows:
8. Now press the "OK" button to this window, and you will return to the "Permissions for <sharename>" window. Once in this window, select the user you added. Currently the window will only show "Read" access for that user:
9. Now tick the tick box under "Allow" for "Full Control, as shown in the screenshot below, and choose "Apply", and then press "OK" to close the window as shown:
10. Now continue to choose "OK" and "Close" to the remaining windows, to close down all the permissions and properties windows.
The section is now complete.
6. Enabling SMB 1.0/CIFS support in Windows
In this section we will turn on SMB 1.0/CIFS File Sharing Support in Windows to support the Forcefield Samba connection.
NOTE: A reboot will be required after performing these steps.
1. In the Windows search bar, on or near the start menu, type "Turn Windows features", and press Enter, or open the "Turn Windows features on or off" control panel app shown. This will open the Windows Features dialog box.
2. Scroll down to SMB, and ensure that all of the items shown in the screenshot below are ticked:
3. Now press the "OK" button. This may take a few moments to enable these features, and will also ask to perform a reboot. This reboot is necessary for these features to start working, so must be performed.
You have now completed this section.
7. Creating SMB (CIFS) storage in Forcefield
In this section, we are now ready to create the Samba share record in Forcefield.
1. In Forcefield, depending on Forcefield menu version, you will want to navigate to the SMB (CIFS) share settings location. In the classic menu structure, this is under: Databases > Computer Equipment > Storage > SMB (CIFS)
2. Enter the details of your share as follows (Press F1 in Forcefield in any of these boxes for further help as well):
SMB Storage: - Enter whatever you would like to name this in Forcefield share here
Connection Made From Node: - enter the node number of the node you are using here, usually 1
Connection Check Interval: - press F1 for help on this, however an example interval may be 300, which is every 5 minutes - you may want shorter on your own system
Machine: - Enter your computer name here - this is the name you would have seen prefixed to the user created in an earlier section
Address: - Enter the IP Address of your computer here - it must have a fixed / static IP address
Share: - Enter the share name of the folder you created - when you shared it in section 5, this is the name it was shared as, usually the same as the folder name
User: - Enter the username you created in a previous section
Password: - Enter the password you created for that user
This screenshot is an example of how this could be set up:
3. Press the Save icon, to save the record. You will be asked if you want to test the connection, it is a good idea to choose yes at this stage to confirm it works successfully. You should then see a message of success, or a failure with a reason.
Successful share mounting:
If you see a failure here, see Appendix A below for further troubleshooting.
This section is now complete, and you are now ready to use your Samba share.
Appendix A. - Troubleshooting connection problems
In this section we will cover some of the common troubleshooting required when a Samba share connection doesn't work, or stops working.
NOTE: Windows Update frequently disables SMB 1.0/CIFS File Sharing Support mentioned in step 6, so this section also covers checking that if your share was working, but has now stopped working.
When a share won't work after initial setup
Firstly, it is important to check through all the procedure steps mentioned above in this article, and ensure that they are all set or followed correctly. It may also be worth performing a reboot of the computer afterwards, and trying again.
However if that still doesn't fix the problem, then you may need to check with your network administration to ensure there are no restrictions on your computer or network that may prevent SMB sharing from working. The share computer should be on the same network subnet as the Forcefield server ideally to ensure proper operation.
CIFS uses UDP ports 137 and 138, and TCP ports 139 and 445
You will need to ensure that your network switches and any routers, if used, allow forwarding of all traffic on these ports.
When a previously working share stops working
Windows WILL DISABLE the SMB 1.0/CIFS File Sharing Support set up in section 6 of this article if it has not been used for 15 days (and possibly on other conditions as well). So if a previously working share stops working, check the following section again, and re-enable it (with a reboot) if necessary. This usually fixes the issue in most cases.
See Section: 6. Enabling SMB 1.0/CIFS support in Windows
However if that doesn't fix the issue, you may need to also check:
- Go through and check all of the above procedure steps again to ensure that any IT or Windows Update applied group policy or registry changes haven't overwritten or removed the items needed for a Samba share to work. This can frequently also be the cause on IT managed systems. It is important to check all steps in the above procedures in this guide are still in place.
- Check that no network management - switch or router if used - changes have been made that may be stopping CIFS from working (see above for CIFS ports used)
When Forcefield won't see a backup on a Samba share
If Forcefield won't see a backup that you wish to restore from, or a history backup that you wish to report from, on a Samba share, the suggested solution is as follows:
- Create any report, or backup, to the Samba share first. After this has been done, Forcefield should now see the backups, and you should be able to do a restore.
You have now reached the end of this guide.