Forcefield: Creating Samba (CIFS) Storage in Windows 7
NOTE: For Windows 10 & 11 - please see the Windows 10 & 11 article here:
Forcefield: Creating a Samba (SMB/CIFS) share in Windows 10 & 11
Introduction
This bulletin describes the process of creating Samba or CIFS (Common Internet File System) storage on a Windows computer.
Note
Refer to “Setting up an export/import folder on a Windows computer” in the Forcefield External Interfaces Manual for complete details. This bulletin describes only the key Windows 7-specific tasks as an addendum to the manual. You must configure the following items in order for Forcefield to access shared folders in the Windows environment (Professional, Ultimate or Enterprise versions only).
Refer to Windows Help for additional information.
Summary
The following changes are required to allow a Samba/CIFS connection.
1. Create a local user account on Windows PC.
2. Share a folder and give local user read/write access to share.
3. Group policy change to network settings.
4. Windows registry change.
User account
Create a new Windows user account with either user or administrator privileges and assign a password. On Windows PC go to Control Panel > Administrative Tools > Computer Management or Start > Run > compmgmt.msc /s to open Computer Management, or [Win]+R, compmgmt.msc /s. The password must meet the following criteria
1. At least one capital letter
2. Contain non consecutive numbers eg. 1357
3. Six (6) to fourteen (14) characters long.
4. Must not match the user name. E.g Mforce1357
Ensure the following options are ticked
• User cannot change password
• Password never expires
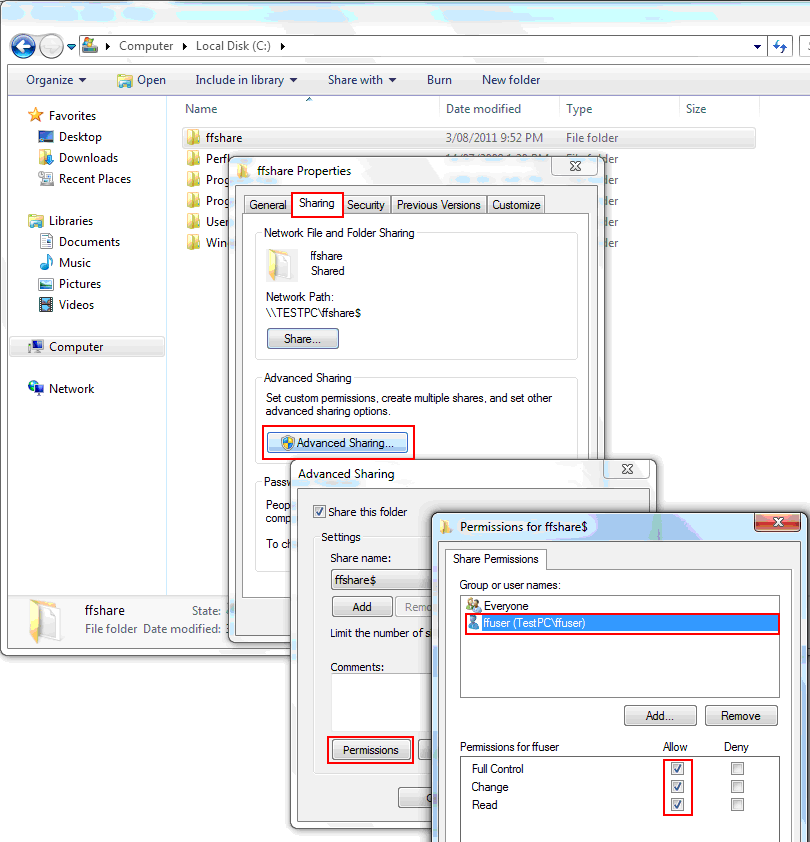
Share folder
Configure or create the following items:
• Create a shared folder on the Windows computer for example C:\Forcefield
• Ensure that File and Printer Sharing is installed in the network setup. See Control Panel, Network Connections
• On the shared folder assign read/write security and sharing privileges to the above Windows user.
• Ensure that the Windows user has been allowed access to the shared folder on the share and security tabs
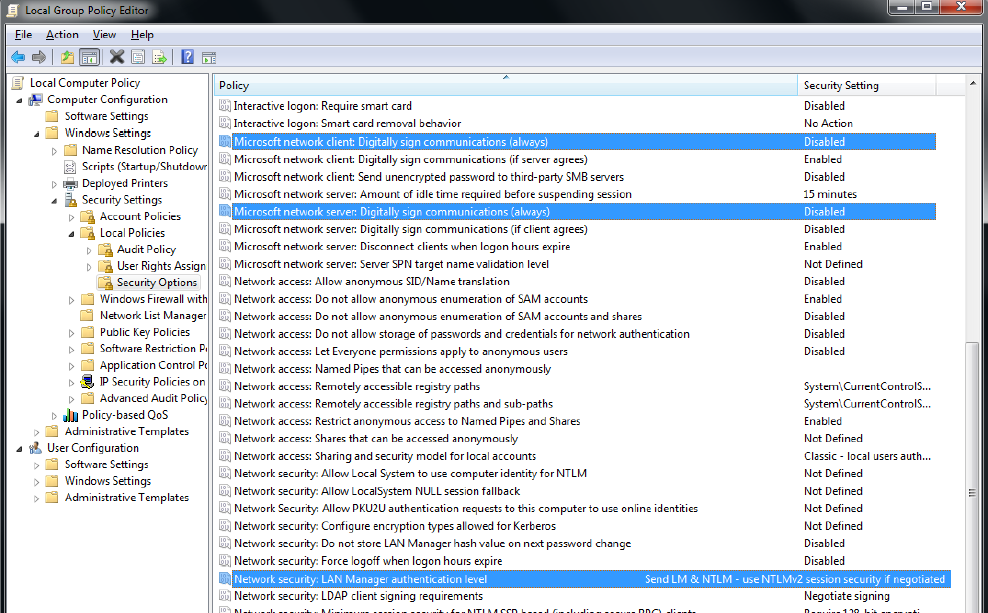
Group policy
To edit the group policy
1. Start > Run > gpedit.msc or [Win]+R, gpedit.msc or Search hard disk for “gpedit.msc”, then open
2. Click the + boxes to navigate to Computer Configuration > Windows Settings > Security Settings > Local Policies > Security Options.
3. In the right-hand pane, ensure that the following items are set:
• Microsoft network server: Digitally sign communications (always) changed to Disabled
• Microsoft network client: Digitally sign communications (always) change to Disabled
• Network Security: LAN Manager Authentication Level is set to any that does not “Refuse LM". Typically use “Send LM & NTLM – use NTLMv2 session security if negotiated”
4. Exit from the Group Policy editor.
Registry keys
Caution: Always use extreme care when editing the Windows registry! Making a mistake while editing the registry can cause Windows to behave erratically. To fix this problem, you may need to reinstall your operating system.
To edit the Windows registry
1. Start > Run > regedit or [Win]+R, regedit or Search hard disk for “regedit.exe”, then open
2. Click the + boxes to navigate to HKEY_LOCAL_MACHINE > SYSTEM > CurrentControlSet > Control > Lsa.
3. In the right-hand pane, right-click lmcompatibilitylevel and then select Modify. Change the Value data to 1, and then click OK.
4. In the right-hand pane, right-click nolmhash and then select Modify. Change the Value data to 0, and then click OK.
5. Exit from the Registry Editor.
Samba Setup for Windows 7 Enterprise
Creating user on Windows 7 Enterprise
Changing share permissions on the folder

Changing security permissions on the folder
gpedit policy changes

Registry changes

Successfully connection Windows 7